Monday, November 16, 2020

Farm House

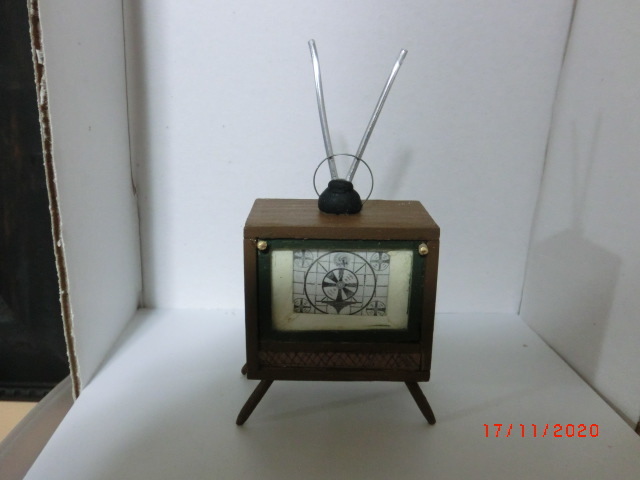
 I didn't get much done on the farm house this week.  I've been working on Christmas gifts and exchanges.  So much to do, so little time.  This week I decided to make our television.  I was about four when we got our lovely black and white television.  Back in those days unless you had a great antenna you could only get two channels.  My older brother talked my Dad into letting him build an antenna.  He was ten years old but an avid reader of Popular Mechanics.  So we were lucky and got a few more channels.

I started by making the box.  Old TV's weren't 70".  I think ours was 13".  Then I made the inside frame for the picture tube and made some legs.
I think the most difficult part was making the curve for the tv tube.  My brother fortunately knew that it was an admiral TV.  I made a mid 50's Admiral TV.
I stained the cabinet a dark wood color.  It probably was actually wood in those days.  Remember the test pattern anyone?  I think sometimes we saw the test pattern more that we saw TV programs.  But, I do recall watching Walt Disney, Ozzie & Harriet and George Burns.
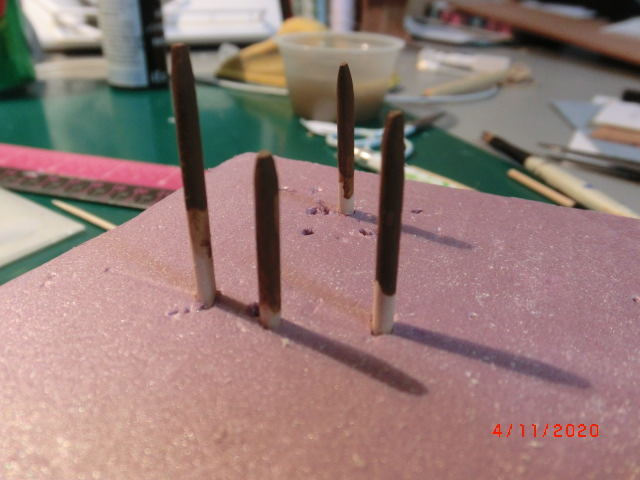
Once this part was finished I only had to make the rabbit ears.  

This was one of the quickest farm house pieces of furniture I've made yet.  Unlike the wringer washer which took a very long time.


Monday, November 2, 2020

Farm House

 Today I am going to post the wringer washing machine I made.  I'm sure that this wringer washer is not exactly like the one we had but it is close enough.  I did try to take pictures all the way through but I didn't quite make it.  I keep forgetting to take pictures.  So this is the start.  We had a square wringer washer.

I put the two pieces together and did a lot of sanding to round the corners.  As you can see here I put the agitator in and started to build the arm for the wringer part.


The next part that I made was the wringer part of the washing machine.  Fortunately for me I was able to follow, mostly, the design by Kris Compass on 1 Inch Minis.  I love everything she does.
We had a shiny tray for guiding the clothes through the wringer.  I tried several approaches to that part and mostly without much success.  I finally made the tray with Fimo and covered it with shiny tape.

You can see here that I added the two arms for selecting the wash cycle.  In the final pictures you will see the electrical cord, the hose for draining the tub and the wheels on the bottom.
 
Overall, I like the wringer washer and I know it will look great in the farm house.

On another note, remember the leprechaun door I made going down to the basement of the house?  Well, I did fix that door since no one in my family is a leprechaun.

I am going to start working on putting the first floor of the house together.  I am somewhat afraid of doing this step only because I have been building by the seat of my pants.  Who know if it will go together right.


Thursday, October 8, 2020

Farm House

 I have not worked on the farm house in a little while.  We finally got our boat in the water after waiting all summer.  The Thanksgiving weekend is the last weekend it will be in the water so we are trying to take advantage of that.

I did manage to frame my parents wedding picture.


I will hang these pictures in the living room.  I don't believe they actually hung in the house but I thought it would make the farm house more homey.  I also bought some flowers in pots from Freedom Miniatures to put on the window sill in the kitchen.  My Mom usually had flowers growing in pots.
I have started to work on the wringer washer.  Ohhh that's a big job.  I doing what my friend Marilyn does all the time - flying my the seat of my pants.  That is so difficult for me.  The wringer washer won't be exactly the same as the one we had but I'll do the best I can.  My parents bought it after the first set of twins were born, after WWII, so it has been difficult to find pictures.  


Thursday, September 17, 2020

Farmhouse

 I had the chance to work on the farmhouse a little bit this week.  I finished the kitchen stairs and did some wallpapering in the kitchen and some wainscoting.  I didn't get much done mostly because my sweet little girl, Bella, was suppose to have surgery last Thursday but ended up not having it until Monday of this week.  This is a picture of Bella making a funny face.

My friend Marilyn is the "fly by the seat of my pants" girl.  Me I like to have each step planned, drawn out and measured.  This farmhouse is working into being a "fly by the seat of my pants" project.  This scares me because when I get to the point of putting it all together.....I am worried.  Let's face it, what are the chances of it coming together with no issues.

So this is the wall at one end of the kitchen.  I'm beginning to think the kitchen was 18 X 20 and not   16 X 18.  Oh well, too late now.  (See why the "fly by the seat of my pants" issue is scary for me)

  
The doorway shown in the second picture is the door to the basement.  I have a feeling I will have to make it taller.  However, until I speak with my brother, Bill, I'll leave it this size.
                          
Okay, it's not suppose to be a leprechaun door.  So clearly I have to increase the size.  Oh dear.


Monday, September 7, 2020

Farmhouse

 I haven't had much of a chance to mini for the past two weeks.  Things just seemed to have gotten out of hand.  I did manage to make 2 double beds.  We were 5 girls and I was the only girl without a twin.  You would think that I would be sleeping in a single bed but as it happened I shared a bed with my sister, Joyce, who is a year older than me and her twin, Joan, got the single bed.  (I think it was an arrangement we all liked.  I think Joan thought we were silly)

Both of these beds were metal beds just like the rest of the beds us kids slept in.  I haven't distressed these two beds yet.  I hate distressing anything but if I want them to look more realistic I will definitely have to distress them.  

I started by making the headboard and footboard, much the same as I did for the single beds.  I decided to do it a little different this time hoping to get a more realistic looking bed.  I used styrene again because I managed to have just enough for two double beds.  
The first picture is the beginning of the headboard while the second picture is the two footboards.  Even though our beds were not super fancy they were nice beds.
Once I had the beds put together (well at least one of them at this point) I made the base for the mattresses.  I took the mattress material with me to visit my husbands aunt.  She is an amazing quilter so visiting her is always fantastic.  I told her that I was going to have to make 3 single quilts and 3 double quilts which I was not looking forward to doing.  She measured my double mattress and said maybe she could help out.  She's a busy lady so I don't expect her to take the time for my quilts but it sure would be nice.

I added some beads to the headboard and gold covers on the spindles of the headboard and footboard.  So except for the distressing I am finished making metal beds.  (Oh dear, I don't really want to distress these nice beds.........but........I guess I must.


Monday, August 24, 2020

No Post Today

 I am away visiting a very special lady today in St. Stephen.  I’ll be back next week.

Monday, August 17, 2020

FARMHOUSE

I have not had much of a chance to work on minis this week.  Let me explain.  My hubby is a constant snacker.  Last week he was diagnosed with diverticulitis.  He had to go on clear liquids, then soft food and gradually incorporate more foods into his diet until he finishes his medications.  It's not going well, he is STARVING by his account.  I'm hoping to get things back to somewhat normal this week.

I did make two screen doors for the farmhouse.  Actually my hubby did cut out all the outside walls of the farmhouse for me.  Now I just have to cut out the 19 windows and 3 doors.  Very exciting.

  
I used 1/4" wide by 1/16" thick wood.  Once I made the frame I put a piece of screen in between the two frames.  The doors were not the same, one door had full corner pieces while the other one and small pieces of wood.  These door were probably the easiest doors I have ever made.  I love making doors.
I just have to rough up these doors now.  They were well worn and showed a lot of wear.  I like things to look really nice and neat so it pains me to make them look shabby.  Alas, I must make it as authentic as I can.

The other item I managed to get made was a little D-table (that's what I call it).  My Mom had one in the den.  Of course, I didn't think to take pictures while I was making it.  I made the top and bottom shelf by using my dremel to shape the edges.  I didn't have any fancy legs for it so I had set it aside to finish at some later date.  Remember the blue chair I turned into a rocking chair?  I put my thinking cap on and used the spindles I had removed from the arm chair.  They made perfect table legs.  I am very happy with the outcome.


Tuesday, August 11, 2020

Captain's Desk

No farmhouse update this week.  This week I wanted to show you a Captain's desk that I just love. 

While trolling the internet I came across an antique auction site.  I scrolled down through the sight and saw this unique Captain's desk.  I fell in love with it and decided I needed to try and make it in miniature. 


The description gave the height, width and the depth of the desk.  That is what I had to go on.    Everything beyond that was guess work.  I decided to use cherry wood for the desk.  I started by making the back panel of the desk.  Then I added the desk bottom since I knew the depth of the desk and the width.  The front panel was easier to do because I already knew the size based on the back and the bottom of the desk.  I was already loving this built.  On the inside of the desk I made the cubby holes the same as what the picture showed.  One side of the desk had four drawers.  Again I just guessed at the sizes based on the picture.


The other side of the desk had a place for maps, drawings or books.  
     

In the four drawers of the desk I put some letters from home, some seashells he is saving for his daughter, and a treasure map he keeps handy (just in case).   

I added some detail to the top and feet of the desk.  Thank goodness for tiny turnings.  I finished it off by filling the desk with everything he would need, including a good stiff drink.  
       
On the inside of the desk I added the two little drawers and put some paper, pencils, ruler, etc. to make it looked like the Captain used the desk often.


Tuesday, August 4, 2020

Farmhouse

Before I go any further I should warn you that sometimes my grammar and sentence structure is a little awkward.  I think it’s because when I grew I learned to speak both English and French at the same time. I went to English school but somewhere along the way learned how to read and write in French.  Needless to say I am sometimes unsure where to put the commas, etc.  Sorry.
I sometimes think the farmhouse is coming along to slow.  I love making things for the inside of the house while waiting for the wood to arrive.  The wood has arrived and I haven't done anything to the house this week.  I made my two brothers beds.  I do not have a lot of before pictures (well you know why).

One bed was a little easier to make because I could make it out of wood even though it was metal.  The other was a metal bed.  I made that one from styrene tubes.  I used the toaster to heat the styrene tubes.  It actually worked quite well except that I did set the smoke detector off.  I am pleased with the final product.

Next I decided to work on some of the chairs for the kitchen.  We had a lot of chairs because we were a total of nine people in my family.  Some of the chairs were blue.  I remember those vividly.  I found some chairs that were the right style.  I did take a few pictures as I worked.  I made one of the chairs into a rocking chair.  Doesn’t every farmhouse kitchen have a rocking chair?


I am very pleased with these chairs, they are exactly like the ones we had growing up.